Party, Kids, Recipes, Guides
Marshmallow Pops
When it comes to kids' birthday parties, it’s likely that you fit into 1 of 2 camps.
Camp 1 - You love everything about kids parties. From deciding on a theme to losing time at The Reject Shop, then of course the actual making of everything from scratch – it brings you untold joy and satisfaction. Or Camp 2 - Your head hurts thinking about what treats to make, will it be yummy? Are you time poor? How is your daughter turning 5 already?
![featured image for [object Object]](/_next/image?url=https%3A%2F%2Fimages.prismic.io%2Ftrs-storefront%2F75bd78ba-1a73-4f3d-854e-f4da6f41207e_blog_marshmallow%2Bpops.jpg%3Fauto%3Dcompress%2Cformat&w=3840&q=75)
The Reject Shop
Last updated
7 Aug 2023
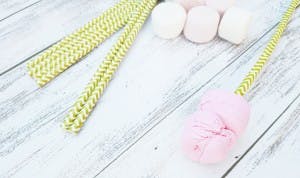
Supplies needed:
- 1 pack of Marshmallows*
- Straws*
- Knife
- Bowls
- Glass
- Block of Chocolate*
- Toppings: Nerds, Fairy Floss*
- Cellophane*
- Ribbon*

Step 1
Depending how many marshmallow pops you intend to make, you can have 1 or 2 marshmallows per straw. Cut a small slit in the middle of each marshmallow on both sides. This will allow the straw to be inserted easily without mashing the marshmallow.

Step 2
Once all the marshmallows have been slit, insert a straw in each marshmallow. You may need to squeeze the marshmallow with your hands to ensure it is secure.
Step 3
Place them in an empty glass and store in the freezer for about 5 – 10 minutes. This will help the straws hold onto the marshmallow.

Step 4
Break the chocolate into pieces in a microwave-safe dish. Heat the chocolate in the microwave while stirring every 25 seconds until the chocolate is nice and smooth.
Alternatively, stir slowly in a small dish on the stove till melted.
Step 5
Time to decorate! Now you can remove the marshmallow pops from the freezer and decorate. Dip a pop in the melted chocolate and turn the straw to ensure the melted chocolate covers the whole marshmallow. To stop the dripping, you will need to keep maneuvering the straw. Unfortunately this part takes patience but it will be all worth it in the end!

Step 6
Remove the excess chocolate and get creative by rolling it in your choice of toppings.
Again dip the marshmallow pop in the melted chocolate and then dip and roll it in a bowl of your preferred topping (in this case Nerds). The best way for the marshmallows to set is to stand them in a tall glass once you have finished.
Tip: You can have more than one topping.

Step 7
For the fairy floss topping, repeat step 5 but instead of rolling the melted chocolate marshmallow in the next topping, you will need to place pieces of fairy floss on with your fingers, then dip in the chocolate. Double yum.
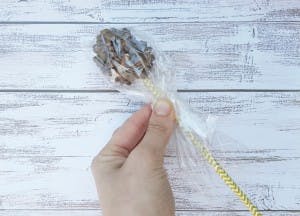
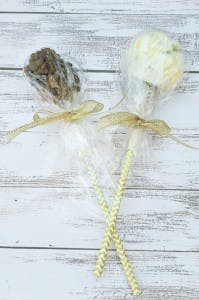
Step 8
Time to wrap.
Note: You can stop at step 6 and serve the marshmallow pops on a stand, but if you really want to impress, keep going to the wrap phase. It’s worth it camp 1 kids.
Cut the required amount of cellophane you need for each marshmallow pop, and tie each of them up with a cute ribbon.
Next step – apply for Mother of the year!

All products or variations featured can be found in store.
Sign up to receive exclusive offers, VIP invites and all our hints & tips